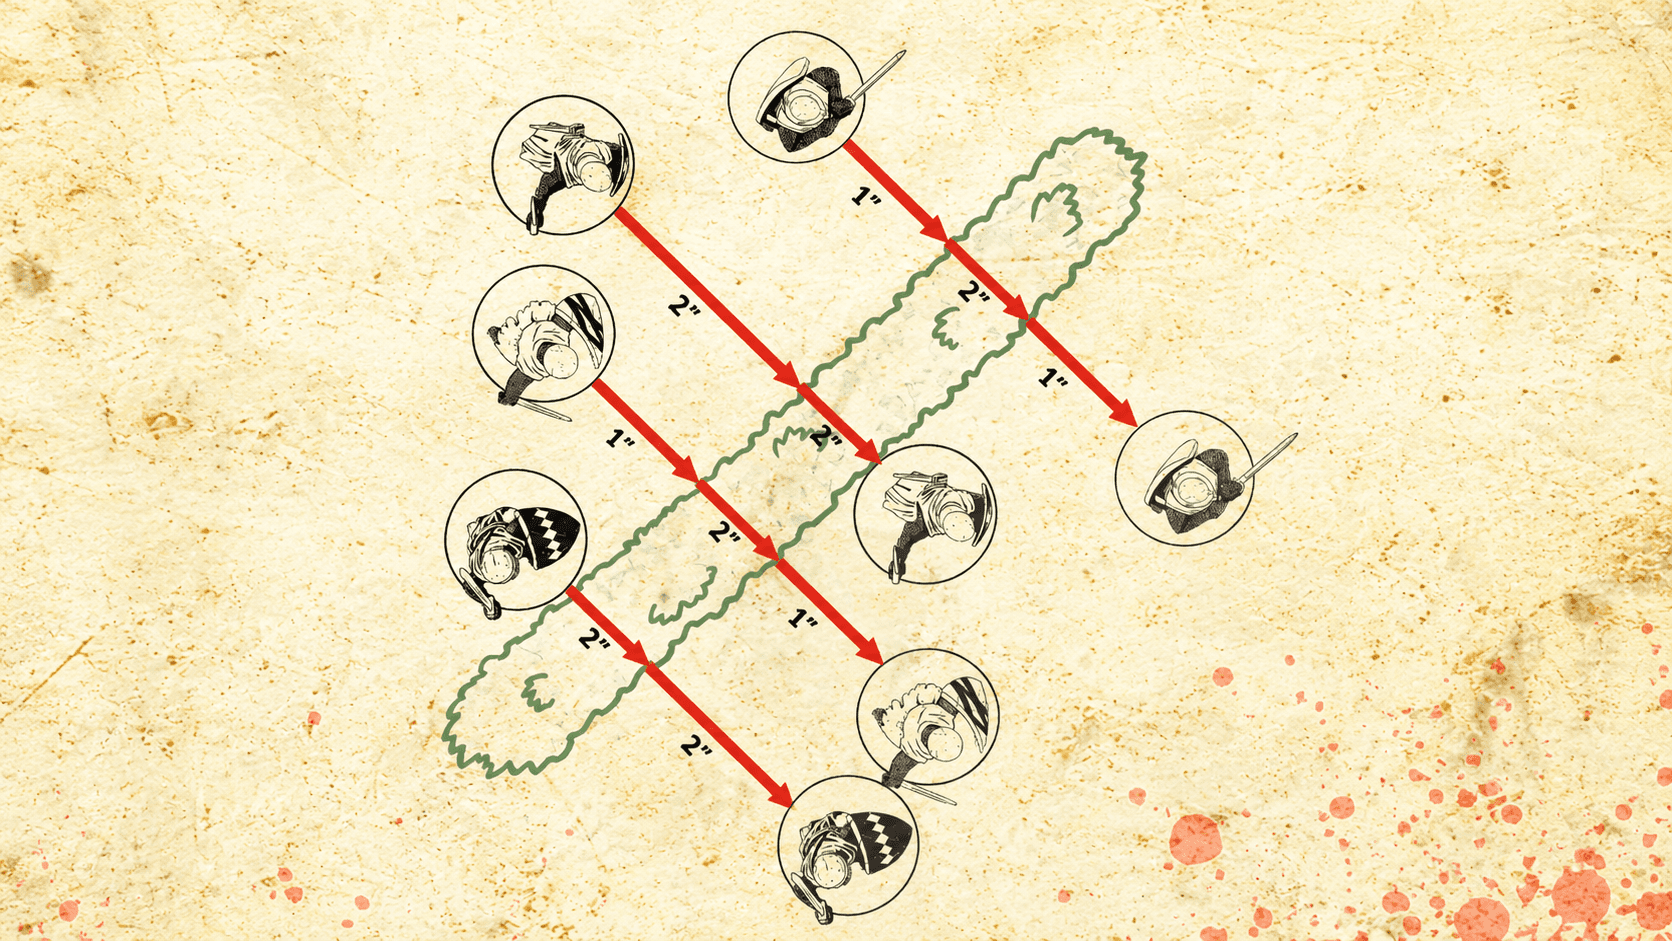
I have been looking again at the rules for Groups crossing obstacles in The Barons’ War.
At the moment, if a Group crosses a wall, fence, hedge or similar obstacle, the Warriors in that Group are expected to cross during the same Action. I want to try a different approach: each Warrior crosses individually, paying the normal movement cost when they do so.
That should make the rule easier to use and bring it closer to the way movement already works elsewhere in the game. It also means a Group can, for a time, have Warriors on both sides of an obstacle, provided it still meets any normal requirement to finish in Coherency.
Changing that one rule has a knock-on effect in a few other places. Charges, Defensive Positions, Forced Back moves, Regroup moves and Defend Actions all need to account for what happens when some Warriors have crossed and others have not. I have therefore written the proposed change as a complete set of rules rather than changing the Crossing Obstacles section on its own.
The version below is the one I would like people to test.
It is not an official change to the rules yet. Please use the wording as written when you try it, rather than adjusting it during the game, so that everyone is testing the same thing.
If you spot a situation I have missed, find an interaction that causes a problem, or simply find that something does not work as expected on the tabletop, please let me know.
You can leave your feedback in the comments below or send me an email using the contact details on the site.
CROSSING OBSTACLES
Page 79
Groups can cross Obstacles that are up to 1” high, at a cost to their Movement.
Infantry must spend 2” of movement to Cross an Obstacle.
Cavalry must spend 1” of movement to Cross an Obstacle.
Move the Warrior up to the Obstacle so that the Warrior’s base is touching the Obstacle’s base. Assuming it has sufficient movement left to Cross, move it to the other side of the Obstacle’s base, paying the relevant movement cost for crossing. The Warrior can then move further if it wishes and is able to.
Warriors in a Group Cross Obstacles individually. They are not required to Cross during the same Action.
Each Warrior must have sufficient movement to reach the Obstacle and pay the appropriate Crossing cost.
A Group making a Move or Run Action must still finish its movement in Coherency as normal.
Warriors from the same Group may therefore finish on opposite sides of an Obstacle, provided the Group satisfies any normal requirement to finish in Coherency.
When determining Coherency, use the normal Coherency rules. The presence of an Obstacle between Warriors does not affect Coherency.
Groups cannot cross Obstacles that are over 1” high without using the rules for Climbing or Ladders. Obstacles over 1” tall are Impassable to Cavalry.
CHARGING ACROSS OBSTACLES
Pages 43 to 44
Warriors may Cross Obstacles as part of a Charge.
Resolve the movement of each Warrior individually. Each Warrior moves in a straight line towards the enemy as normal and must have sufficient Charge movement to reach the Obstacle, pay the normal Crossing cost and continue its movement.
Every Warrior which can reach base contact with an enemy Warrior must do so.
If a Warrior can reach base contact with an enemy Warrior without Crossing the Obstacle, it does not have to Cross.
If a Warrior can only reach base contact with an enemy Warrior by Crossing the Obstacle, it must Cross and pay the normal Crossing cost if it has sufficient Charge movement to do so.
If the straight-line Charge move takes a Warrior across the Obstacle, and the Warrior has sufficient Charge movement to reach and Cross it, it must Cross even if it cannot then reach base contact. It then continues moving as close to an enemy Warrior as possible.
If a Warrior reaches the Obstacle but does not have sufficient Charge movement remaining to pay the Crossing cost, move it as far as possible so that its base is touching the Obstacle.
If a Warrior can reach more than one enemy Warrior, determine which enemy it contacts using the normal Charge rules.
Warriors in the Charging Group are not required to Cross the Obstacle together.
As normal, a Charging Group does not need to finish its Charge movement in Coherency. The Group may use its Regroup Move to return to Coherency. If it remains out of Coherency, the normal rules for being out of Coherency apply.
The normal Failed Charge rules still apply. Resolve a failed Charge move as normal, including any Crossing costs required by the Warriors’ movement.
CHARGING WHEN THERE IS INSUFFICIENT SPACE
There may be situations where a defending Group is positioned just behind an Obstacle, leaving insufficient room for the attacking Warriors' bases to fit between the Obstacle and the defenders. This does not, by itself, prevent a Charge.
If the attacking Warriors could normally Cross the Obstacle and have sufficient Charge movement to pay the Crossing cost and reach the defending Group, the Charge may proceed. Where there is insufficient room to physically place the attacking Warriors in base contact, treat them as being in base contact for the purposes of resolving the Combat. The attacking Warriors remain on their original side of the Obstacle. This is an exception to the normal requirement to physically Cross an Obstacle during a Charge.
The defending Group does not receive the benefits of a Defensive Position unless it meets the normal requirements for occupying one.
Resolve the Combat as normal, including casualties and Forced Back moves. If the defenders are Forced Back, they move away from the attackers as normal. If the attackers are Forced Back, they move away from the Obstacle. The attacking Warriors do not automatically Cross the Obstacle following the Combat.
If the attackers are victorious, they may Cross the Obstacle during their Regroup Move, provided they have sufficient movement to pay the normal Crossing cost and can finish in a legal position, observing the normal Coherency and Regrouping requirements. If they cannot be legally placed on the other side, they remain on their original side of the Obstacle.
This clarification does not allow Warriors to Charge across Impassable Terrain or ignore the normal restrictions on movement.
DEFENSIVE POSITIONS
Pages 85 to 86
A Group is considered to be occupying a Defensive Position if at least half its Warriors are in base contact with Terrain which provides a Defensive Position and all Warriors in the Group are on the same side of the Obstacle.
A Group with Warriors on both sides of an Obstacle does not occupy that Obstacle as a Defensive Position.
The Warriors are considered to be crossing the Obstacle rather than defending it.
If a Group occupying a Defensive Position is Charged, Warriors separated only by the base of the Terrain are considered to be in base contact. The attacking Warriors do not need to Cross the Obstacle to fight the defenders.
FORCED BACK INTO AN OBSTACLE
Page 53
If an Obstacle lies in the path of a Forced Back move, resolve the movement of each Warrior individually.
A Warrior may Cross the Obstacle if it has sufficient Forced Back distance remaining to pay the normal Crossing cost.
If the Warrior’s Forced Back move would take it across the Obstacle but it does not have sufficient movement to Cross, move it as far back as possible so that its base is touching the Obstacle.
If one or more Warriors are unable to Cross in this way, the Group is Trapped.
The Group suffers one automatic casualty, regardless of how many Warriors were unable to Cross.
The controlling player must remove the casualty from among the Warriors who were unable to Cross.
If a Commander is one of the Warriors unable to Cross, another eligible Warrior must be removed instead if possible. If the Commander is the only eligible Warrior, the Commander is removed.
Warriors who were unable to Cross remain on their original side of the Obstacle. They are not moved across it after the casualty is removed.
If the Group finishes with Warriors on both sides of the Obstacle, it does not occupy the Obstacle as a Defensive Position.
If all surviving Warriors finish on the same side of the Obstacle, determine whether the Group occupies a Defensive Position as normal.
This means that if the only Warrior which failed to Cross is removed as the casualty for being Trapped, the remaining Warriors may occupy the Defensive Position if they otherwise meet the normal requirements.
If the Forced Back move leaves the Group out of Coherency, the normal rules for being out of Coherency apply.
This replaces the current rule which moves a Trapped Group across an Obstacle after it suffers the automatic casualty.
REGROUPING ACROSS OBSTACLES
Page 54
A victorious Group may Cross an Obstacle as part of its Regroup Move.
Resolve each Warrior’s movement normally, including the usual Crossing costs.
The Group must finish its Regroup Move in Coherency and all Warriors must finish at least 1” away from every other Group.
If there is not enough space for a Warrior to Cross the Obstacle and finish at least 1” away from every other Group, that Warrior may not Cross during the Regroup Move.
DEFEND ACTIONS AND REACTIONS
Page 57
A Group with Warriors on both sides of an Obstacle may not take a Defend Action or Defend Reaction.
The Group must first finish crossing the Obstacle, or move all of its Warriors back to the same side, before it can take a Defend Action or Reaction.
This prevents the repositioning made as part of a Defend Action or Reaction from allowing Warriors to Cross an Obstacle without paying the normal movement cost. The current Defend rules reposition Warriors into base contact around a Warrior used to determine Coherency.
Comments
Comments are moderated before they appear.
No comments yet.
Leave a comment
More articles
BROWSE THE JOURNAL

Game Design
From Whittington Castle to a disputed manor: why medieval lords took up arms, how they asserted their authority, and what their quarrels suggest for The Barons’ War.

Rules
Optional weather rules for The Barons’ War Second Edition, with snow, sleet, rain, fog and extreme heat ready for playtesting.

Projects
How I built William d’Aubigny’s first 500 points for The Barons’ War Second Edition, from his household Knights to the Green Levy, with the painted retinue and downloadable army list.
FROM THE BLACK DESK
Subscribe to my occasional newsletter for notes from my desk about games I’m designing, things I’m playing, miniatures, the hobby and new writing from the site. I promise to only send the good stuff - no spam here!